

Elk Gyro Meat
Elk Gyro Meat
One thing I notice every year as winter winds down is that the freezer fills up with ground meat. The steaks, backstraps, and roasts tend to get eaten first, leaving plenty of burger waiting for its turn.
A Wild Game Twist on a Mediterranean Classic
One thing I notice every year as winter winds down is that the freezer fills up with ground meat. The steaks, backstraps, and roasts tend to get eaten first, leaving plenty of burger waiting for its turn.
Ground elk is one of the most versatile wild ingredients in the kitchen. With the right seasoning and a little creativity, it can transform into something completely different from the usual burgers or chili.
This Elk Gyro Meat recipe is one of my favorite ways to do that.
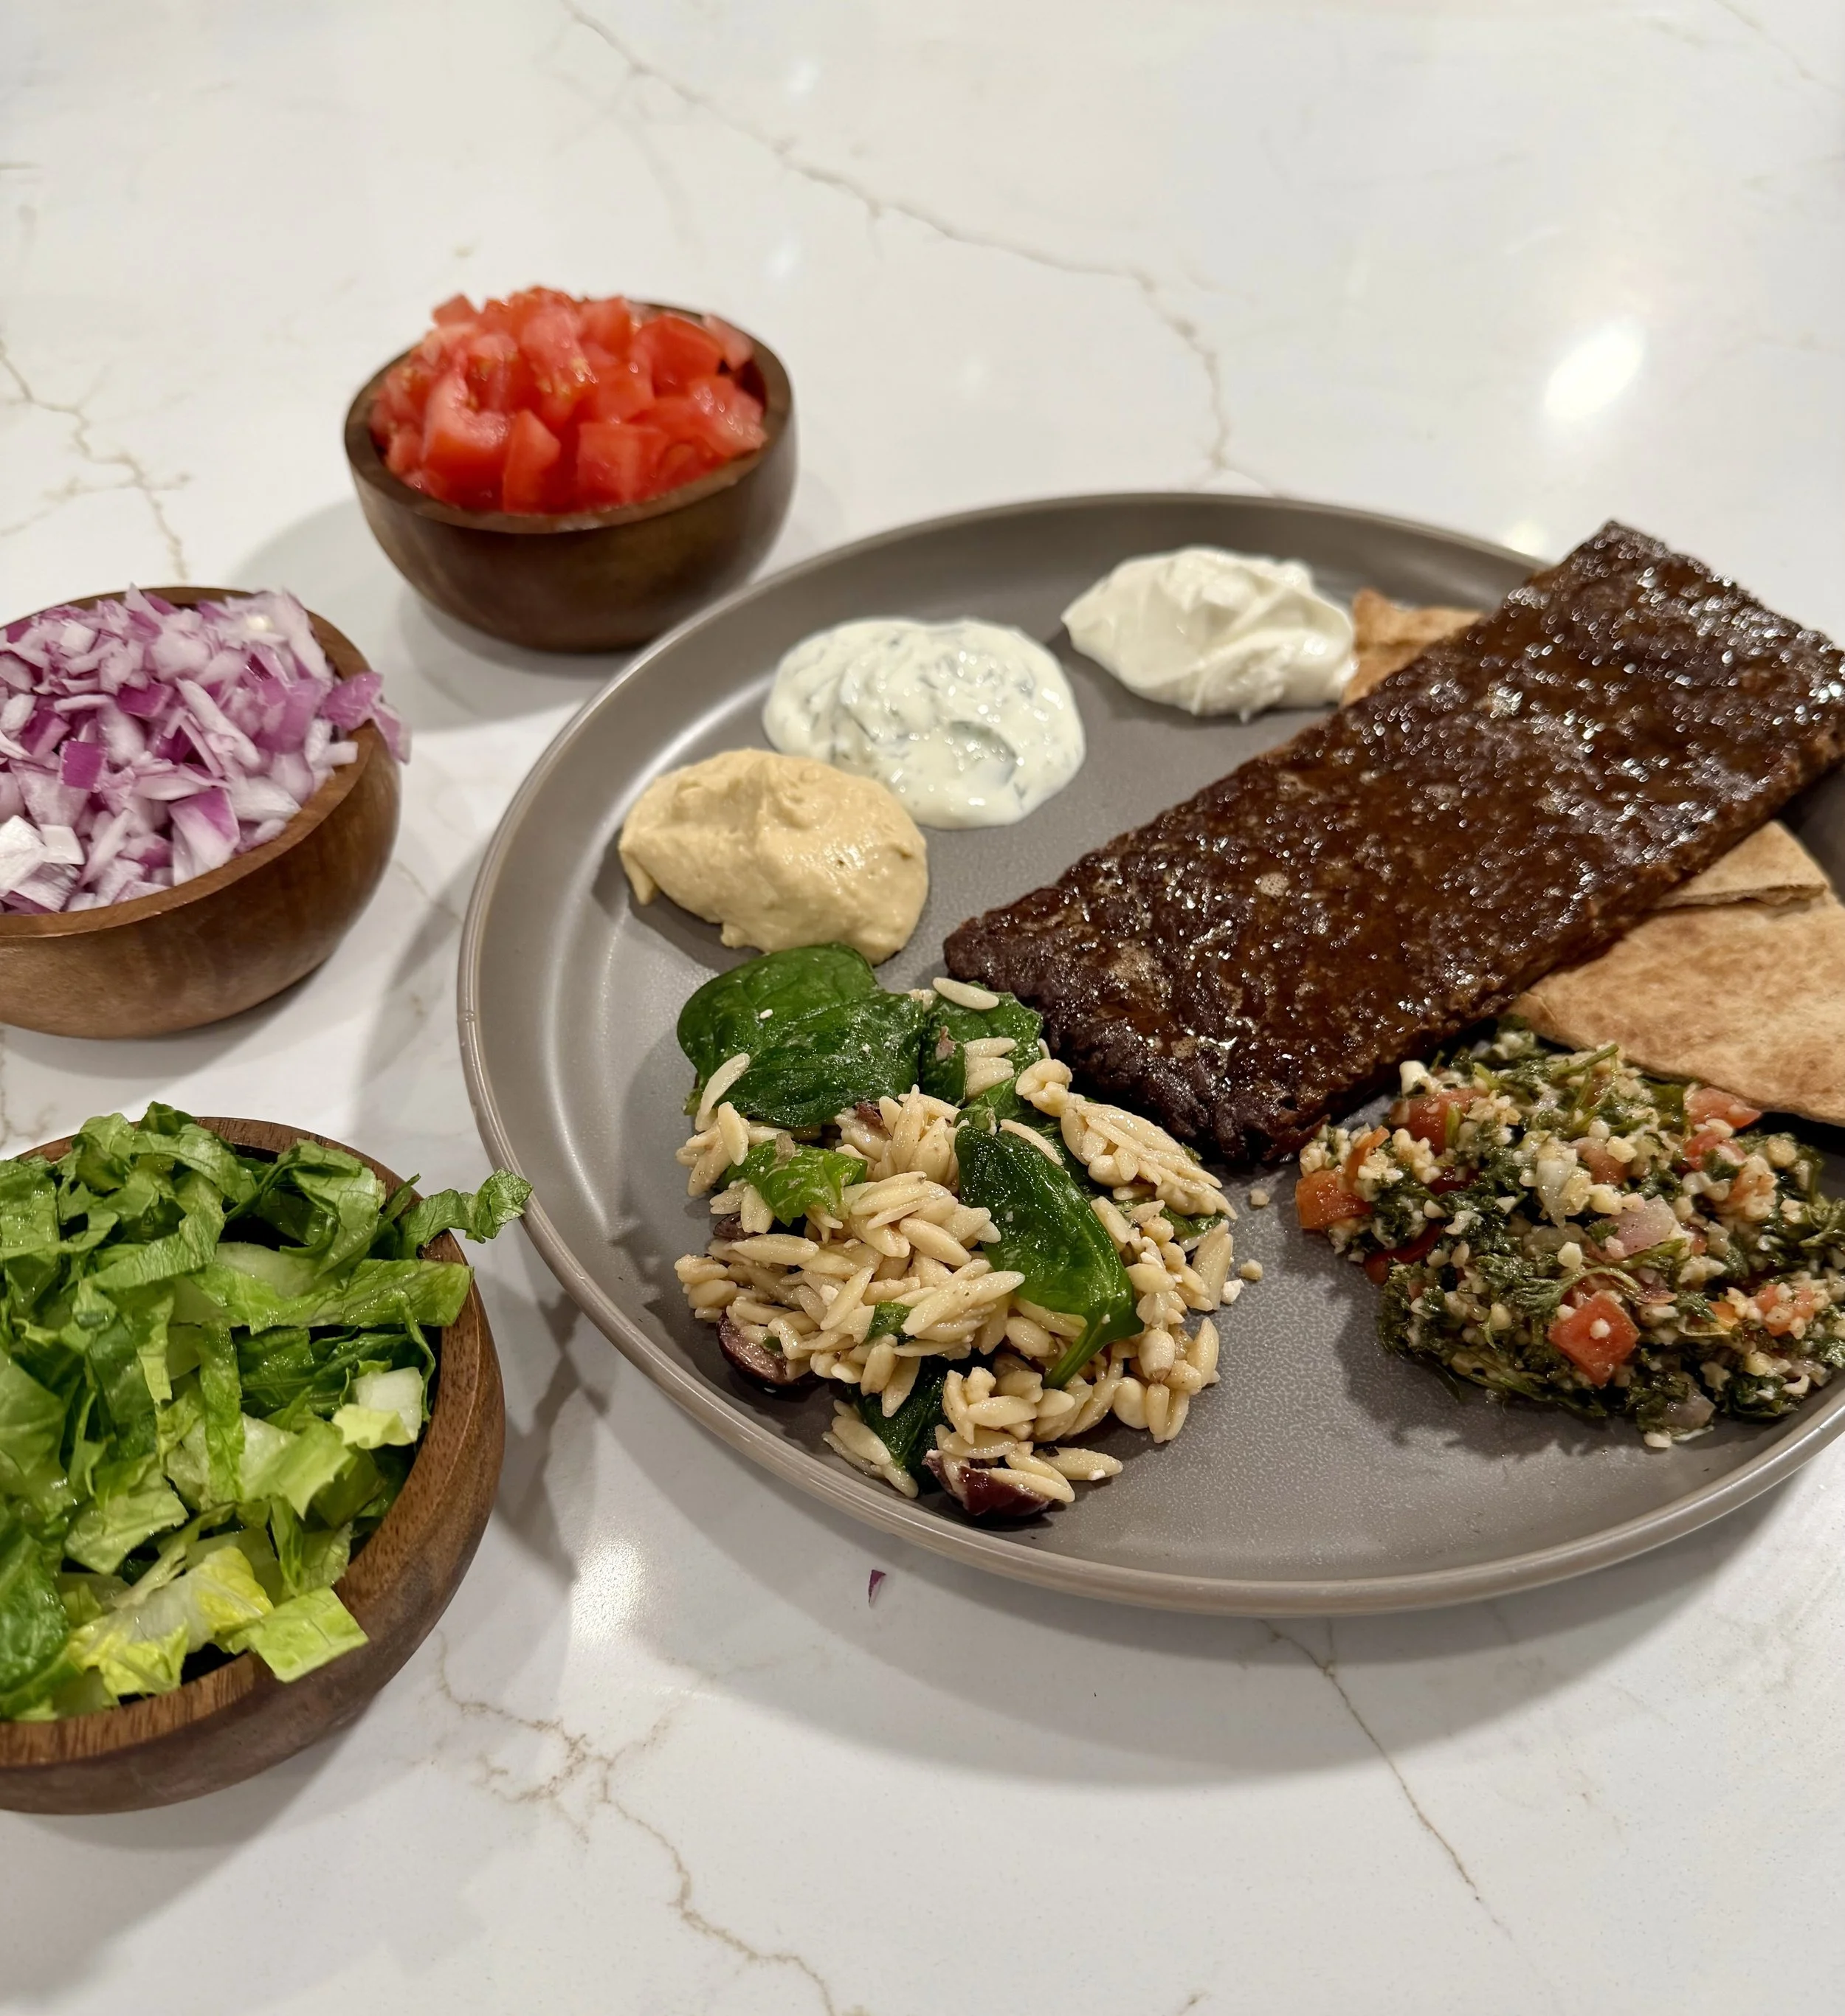
Inspired by traditional Greek gyro flavors, this method turns ground elk into thin, savory slices that are perfect for stuffing into warm pita bread and topping with fresh Mediterranean ingredients. By dehydrating the seasoned meat, you create a dense, sliceable texture that mimics classic gyro meat while intensifying the flavor, yet remains juicy and delicious.
It’s simple, unique, and a great way to elevate wild game in the kitchen.
Ingredients
1 lb Ground Elk
Seasoning Blend
2 tsp dried oregano (the essential gyro herb)
2 tsp garlic powder
2 tsp onion powder (or 1–2 grated onions)
1–2 tsp ground cumin
1 tsp dried thyme
1 tsp ground coriander
1 tsp paprika
½ tsp black pepper
¼ tsp cayenne pepper
1 tsp lemon pepper
½ tsp ground cinnamon (optional but adds authentic gyro depth)
To Serve
Warm pita bread
Crumbled feta cheese
Hummus
Tahini sauce
Tzatziki
Chopped tomatoes
Red onion
Lettuce
Instructions
1. Season the Elk
In a mixing bowl, combine the ground elk with all the spices. Mix thoroughly until the seasoning is evenly distributed throughout the meat.
The combination of oregano, cumin, garlic, and coriander gives the meat that unmistakable gyro flavor profile.
2. Roll the Meat Thin
Place the seasoned meat between two sheets of parchment paper.
Using a rolling pin, roll the meat into a thin, even sheet about ¼ inch thick. The thinner it is, the more evenly it will dehydrate and develop that classic gyro-style texture.
3. Dehydrate
Transfer the meat sheet onto a rack in your dehydrator.
Set the dehydrator to 167°F and dry for about 1½ hours.
The meat should firm up while staying flexible enough to slice.
4. Slice the Gyro Meat
Once dehydrated, remove the meat and slice it into thin strips, similar to shaved gyro meat.
The aroma at this point is incredible—warm Mediterranean spices layered into rich elk.
Build the Perfect Elk Gyro
Warm a pita and layer in:
Thin slices of the elk gyro meat
Crumbled feta cheese
Fresh chopped tomatoes
Sliced red onion
Lettuce
Top with tzatziki, hummus, or tahini for a creamy Mediterranean finish.
The Shotatarian Take
One of the things I love about wild game cooking is how easily it crosses cultures. Elk harvested in the mountains of the American West can just as easily become the star of a Mediterranean street food classic.
This recipe is also perfect for using up ground elk late in the season, when the prime cuts are gone but the freezer still holds plenty of potential.
Simple ingredients. Bold flavor. Wild food done right.
That’s the Shotatarian way.
Stay hungry, stay wild.
— Shotatarian.com

GROUND MULE DEER & HERB DUMPLING SOUP
A Shotatarian cold-weather classic
There are few meals better suited to the end of a long hunt—or a long winter day—than a pot of rich, bubbling hot soup crowned with tender dumplings. This version leans fully into the Shotatarian ethos: ground mule deer, wild game broth, and a lineup of woods-friendly herbs that feel like they belong next to a wood stove or campfire.
Ground Mule Deer & Herb Dumpling SOUP
A Shotatarian cold-weather classic
There are few meals better suited to the end of a long hunt—or a long winter day—than a pot of rich, bubbling hot soup crowned with tender dumplings. This version leans fully into the Shotatarian ethos: ground mule deer, wild game broth, and a lineup of woods-friendly herbs that feel like they belong next to a wood stove or campfire.
Mule deer shines here. It’s lean, deeply flavorful, and when paired with butter, aromatics, and milk, it becomes luxurious without losing its wild character. The dumplings soak up that broth and puff into little clouds of comfort—rustic, hearty, and absolutely doable for any home cook.
Ingredients
The Stew
▢ 1 stick salted butter, sliced
▢ 1 pound ground mule deer
▢ 1/3 cup all-purpose flour
▢ 1 yellow onion, chopped
▢ 4 cloves garlic, chopped
▢ 2 tablespoons fresh thyme leaves
▢ 1 tablespoon chopped fresh sage
▢ 1/4 teaspoon cayenne pepper
▢ 1 1/2 cups chopped carrots
▢ 1 cup chopped celery
▢ 1 cup chopped mushrooms
▢ 4 cups wild game broth
▢ Kosher salt and freshly cracked black pepper
▢ 2 cups whole milk
The Dumplings
▢ 1 1/2 cups all-purpose flour
▢ 1 tablespoon baking powder
▢ 1 tablespoon chopped fresh sage
▢ 3/4 cup milk
▢ Black pepper
Instructions
Build the base
In a Dutch oven set over medium heat, melt the butter. Add the chopped onion and garlic and cook for 2–3 minutes until fragrant. Add the ground mule deer, season lightly with salt and pepper, and cook until just browned, breaking it up with a spoon.Thicken and layer flavor
Sprinkle the flour over the meat mixture and stir well to coat. Add the thyme, sage, cayenne, carrots, celery, and mushrooms. Toss everything together until evenly mixed.Add the broth
Slowly pour in the wild game broth, stirring constantly to avoid lumps. Season with salt and black pepper. Cover and simmer over medium heat for about 10 minutes, until the vegetables are tender and the stew begins to thicken.Make the dumplings
In a bowl, stir together the flour, baking powder, chopped sage, and a generous crack of black pepper. Add the milk and mix just until combined—don’t overwork the dough.Finish the stew
Stir the whole milk into the pot and bring the stew to a gentle boil. Drop heaping tablespoons of dumpling dough directly into the stew, about six at a time. Cover and cook for 10 minutes, until the dumplings are puffed and cooked through.Optional brown butter finish
For an extra Shotatarian flourish, melt 2 tablespoons salted butter in a small skillet over medium-high heat until golden and nutty.Serve
Ladle the stew and dumplings into bowls. Finish with a drizzle of brown butter (if using), fresh thyme, flaky salt, and cracked pepper.
Shotatarian Tip
This recipe is incredibly flexible. Swap in elk, whitetail, or antelope if that’s what’s in your freezer. If your mule deer is extra lean, don’t be shy with the butter—it’s what gives the stew its silky body.
This is wild food at its most comforting. Simple ingredients. Honest flavor. And proof that some of the best meals start with a tag, a freezer, and a Dutch oven.
Stay hungry, stay wild.
— Shotatarian.com
Hunter’s Helper
Hunter’s Helper makes a great meal! This one-pot recipe uses antelope (pronghorn), one of the cleanest-tasting and leanest wild proteins you can cook with. Antelope shines here because it absorbs flavor beautifully without overpowering the dish. Everything cooks in one pot, the pasta pulls flavor straight from the broth, and the sauce comes together naturally—no complicated techniques, no specialty gear.
This is exactly the kind of meal Shotatarian is about: wild food that fits real life.
Hunter’s HelpeR “Makes a great meal”
A one-pot antelope comfort classic
Every hunter ends up with packages of ground meat in the freezer—and if we’re being honest, that meat deserves better than always becoming tacos or burgers. Hunter’s Helper is our wild-game take on a familiar, no-nonsense comfort meal: creamy, cheesy, lightly spiced, and built for busy nights after long days outside.
This recipe uses antelope (pronghorn), one of the cleanest-tasting and leanest wild proteins you can cook with. Antelope shines here because it absorbs flavor beautifully without overpowering the dish. Everything cooks in one pot, the pasta pulls flavor straight from the broth, and the sauce comes together naturally—no complicated techniques, no specialty gear.
This is exactly the kind of meal Shotatarian is about: wild food that fits real life.
Ingredients
2 tablespoons extra virgin olive oil
1 pound ground antelope (pronghorn)
1 medium yellow onion, chopped
Kosher salt and freshly ground black pepper
1 teaspoon chili powder
1 teaspoon paprika
1 teaspoon garlic powder
1 pound short-cut pasta (elbows, shells, or rotini)
2 cups wild game broth or beef broth
2 cups whole milk
1½–2 cups shredded cheddar cheese
1 tablespoon tomato paste
Fresh parsley, for serving
Instructions
Brown the antelope
Heat a large pot over medium-high heat and add the olive oil. Add the chopped onion and ground antelope, seasoning well with salt and pepper. Cook for about 10 minutes, breaking the meat apart as it browns, until the onion is soft and the antelope is fully cooked. Stir in the chili powder, paprika, and garlic powder and cook for another minute until fragrant.
Build the one-pot base
Add the dry pasta directly into the pot and toss to coat it in the seasoned antelope. Pour in the broth and milk, then add the tomato paste. Stir thoroughly, scraping up any browned bits from the bottom of the pot. Taste and adjust seasoning as needed.
Simmer
Bring the pot to a gentle boil, then reduce to a steady simmer. Cook for 5–8 minutes, stirring often, until the pasta is al dente and the liquid has thickened into a creamy sauce.
Finish with cheese
Remove from heat and stir in the shredded cheddar until melted and smooth. The sauce should be rich and glossy, clinging to the pasta.
Serve
Spoon into bowls and finish with fresh parsley. Serve hot.
Shotatarian Notes
Why antelope works: Its mild, clean flavor makes it perfect for comfort food—rich without being heavy.
Extra moisture: If your antelope is extremely lean, a small pat of butter stirred in at the end adds silkiness.
Field-to-family friendly: This is one of the best gateway meals for introducing antelope to new wild-game eaters.
Hunter’s Helper is proof that wild food doesn’t need to be complicated to be great. One pot, honest ingredients, and a freezer full of opportunity.
Stay hungry, stay wild.
— Shotatarian.com
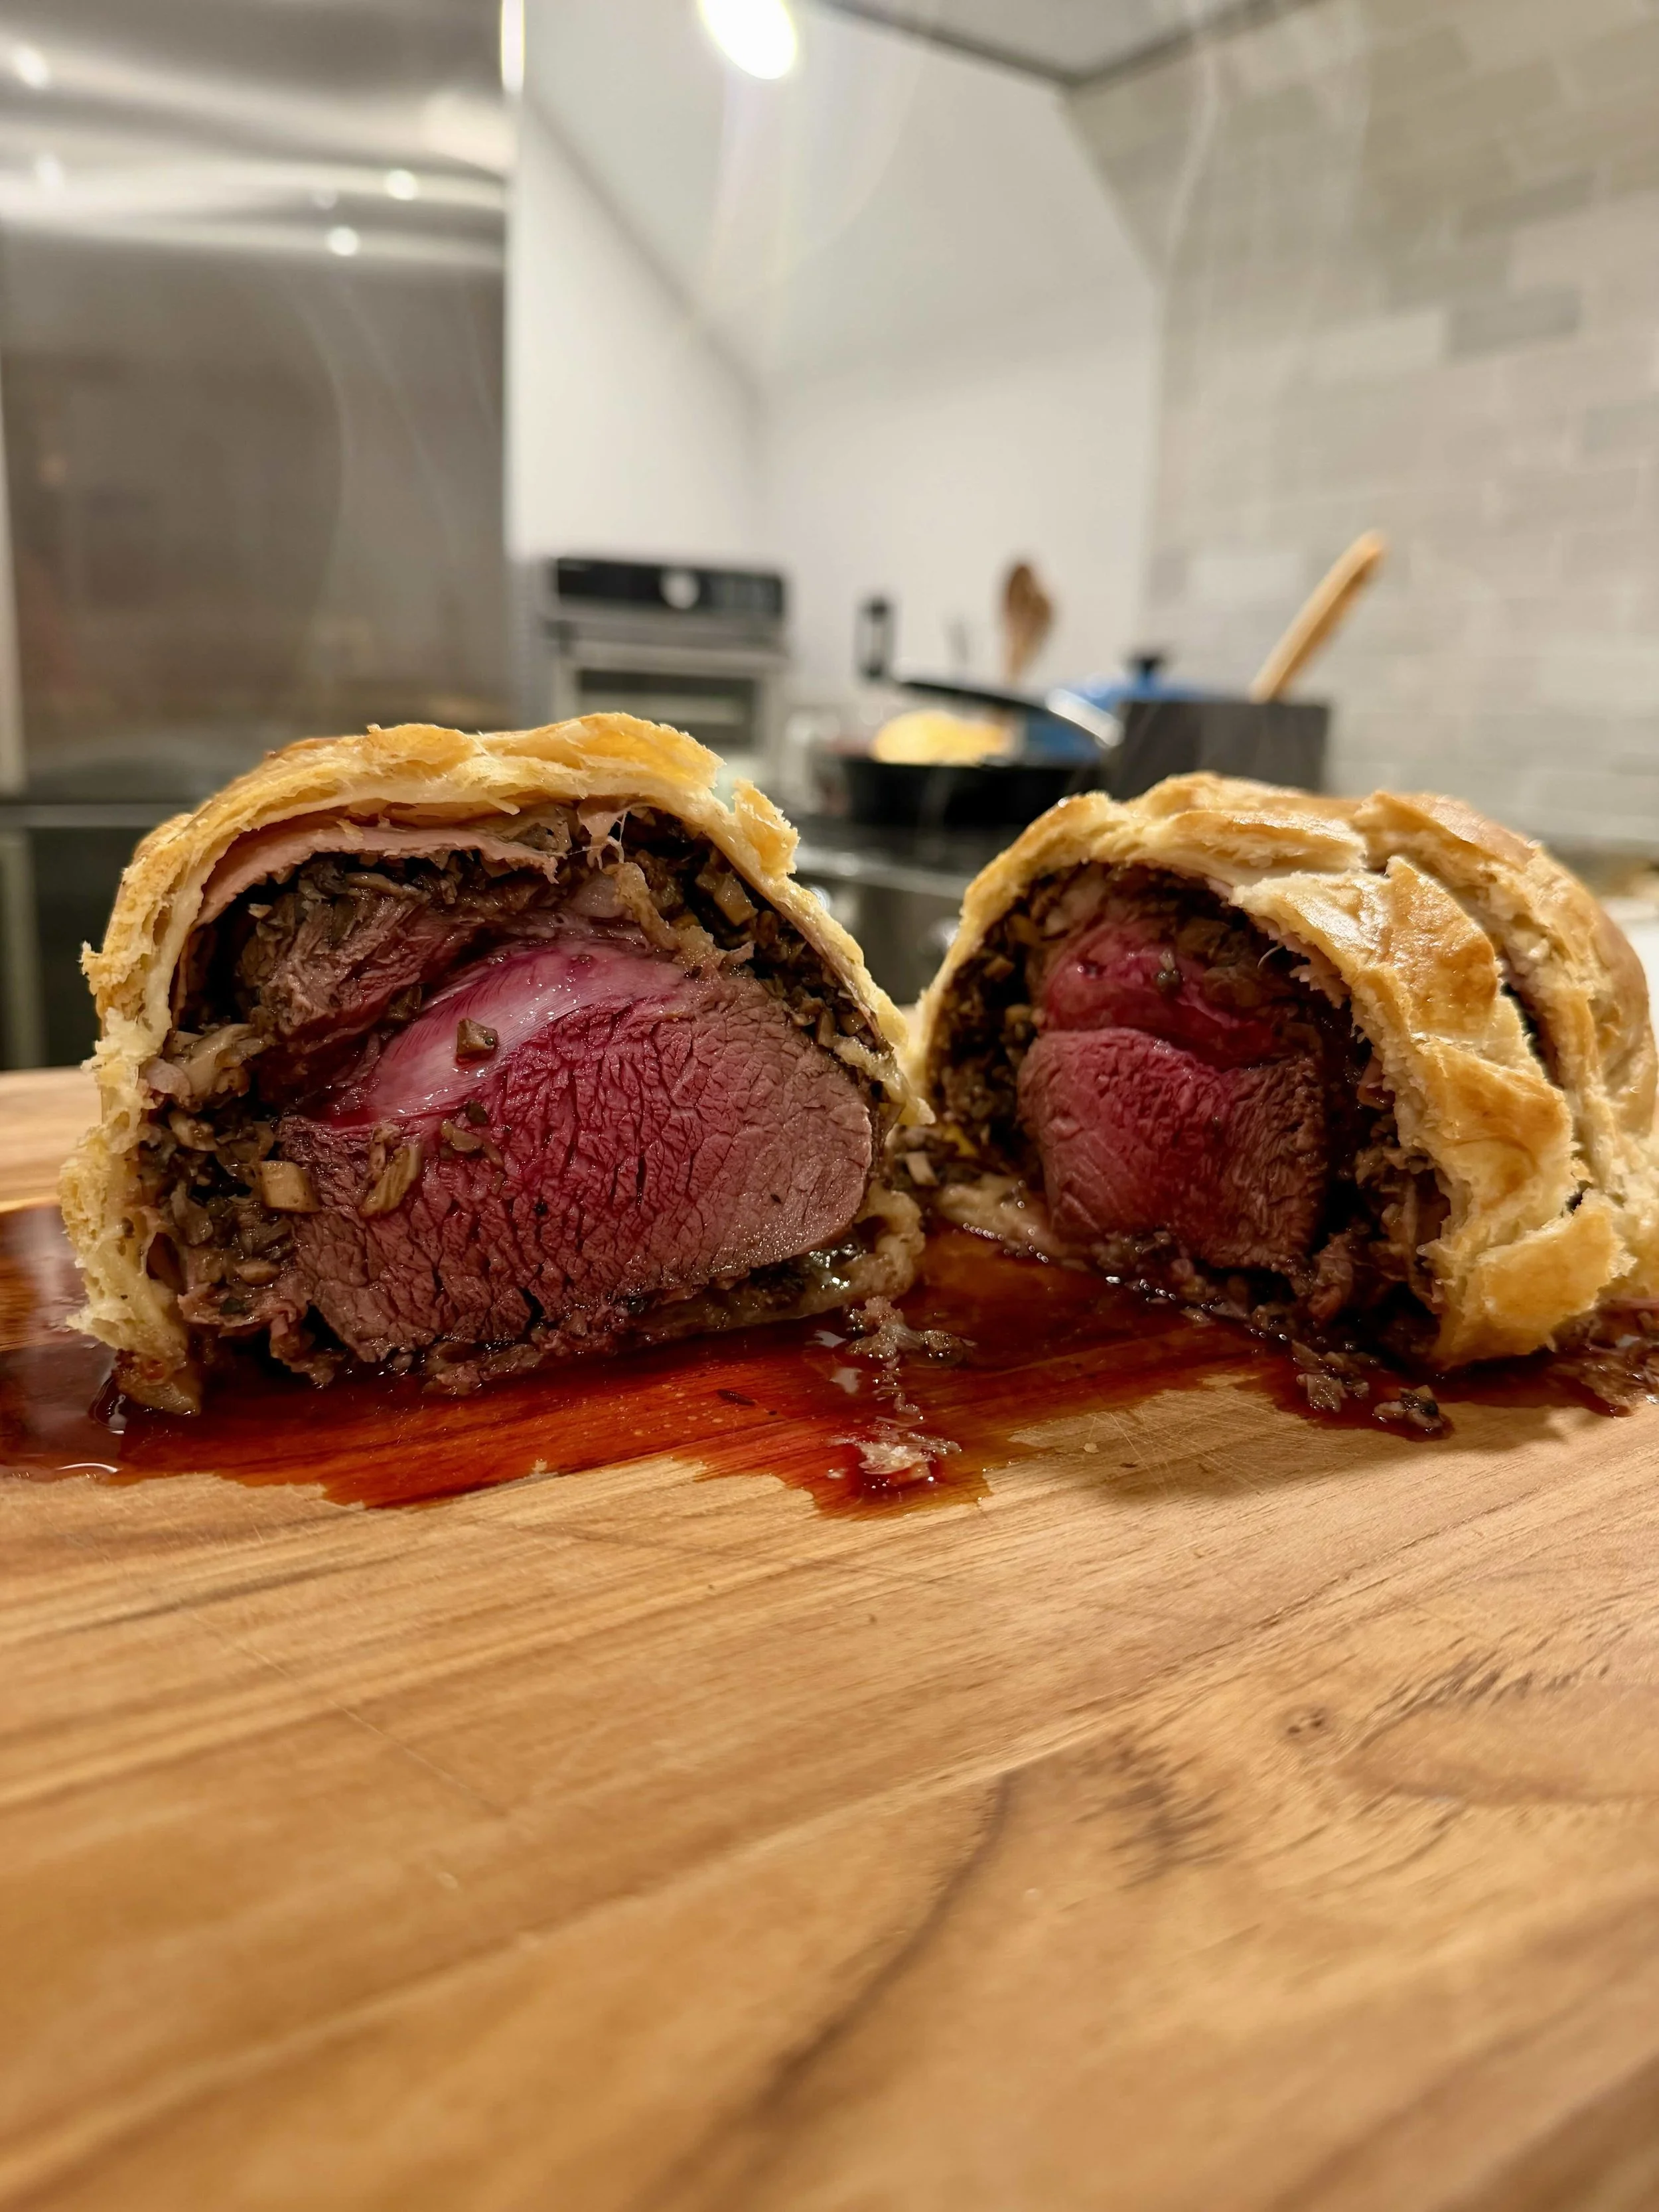
Elk Wellington
Elk Wellington. This recipe looks impressive—but every step is straightforward, forgiving, and totally manageable if you take it one step at a time.
Elk Wellington with Wild Mushrooms & Garlic
A refined classic, made wild—and absolutely doable at home
There are certain dishes that feel like restaurant-only territory. Beef Wellington is one of them. Puff pastry, duxelles, perfect doneness—it sounds like something best left to white tablecloths and Michelin stars.
But here’s the truth: this is a very achievable home-cook dish, especially when you swap beef for one of the finest wild proteins available—elk.
Elk backstrap or a small elk roast is lean, tender, and incredibly clean-tasting. When paired with earthy wild mushrooms, garlic, and a rich red wine sauce, it becomes a show-stopping centerpiece that still feels grounded in the Shotatarian ethos: honoring the animal, cooking with intention, and making elevated wild food accessible to real people in real kitchens.
This recipe looks impressive—but every step is straightforward, forgiving, and totally manageable, just take it one step at a time.
Why Elk Works So Well in a Wellington
Elk backstrap is naturally tender and mild, closer to beef fillet than most people expect—but leaner. That leanness is actually an advantage here. The mushrooms, garlic, and prosciutto (or Parma ham) add richness, while the pastry seals everything in.
Pro tip for home chefs: Elk cooks faster than beef. Keep your sear quick, your oven time tight, and trust the rest period.
Ingredients (Serves 4)
For the Elk Wellington
2 elk backstraps or center-cut elk roasts (about 350–400g each)
Olive oil, for searing
500g wild mushrooms (chanterelles, cremini, porcini, or a mix), cleaned
2–3 cloves garlic, finely minced
1 sprig thyme, leaves only
500g puff pastry
8 slices Parma ham or prosciutto
2 egg yolks, beaten with 1 tbsp water and a pinch of salt
Sea salt and freshly ground black pepper
For the Red Wine Sauce
2 tbsp olive oil
200g elk trimmings (or beef trimmings if needed)
4 large shallots, peeled and sliced
12 black peppercorns
1 bay leaf
1 sprig thyme
Splash of red wine vinegar
1 x 750ml bottle red wine
750ml beef or game stock
Method
1. Shape the Elk (Optional but Helpful)
Wrap each elk backstrap tightly in a triple layer of cling film to help it hold an even, round shape. Chill overnight if you can—this step makes the final Wellington cleaner, but it’s not mandatory if you’re short on time.
2. Quick Sear
Remove cling film. Heat a pan over high heat with a splash of olive oil and quickly sear the elk on all sides—30–45 seconds per side max. You’re just adding color, not cooking it through. Remove and let cool completely.
3. Mushroom, Garlic & Thyme Duxelles
Finely chop the mushrooms. Heat olive oil in a pan, add mushrooms, garlic, thyme, salt, and pepper.
Cook over medium-high heat, stirring often. The mushrooms will release moisture—keep cooking until all liquid evaporates and you’re left with a thick, almost paste-like mixture. This takes about 10 minutes.
Let cool fully. (This step is key—wet mushrooms are the enemy of crisp pastry.)
4. Prep the Pastry
Cut puff pastry in half and roll each piece into a rectangle large enough to wrap one elk loin. Chill in the fridge.
5. Wrap the Elk
Lay cling film on your counter. Arrange 4 slices of Parma ham slightly overlapping. Spread half the mushroom-garlic duxelles evenly over the ham.
Season the elk, place it in the center, and use the cling film to roll everything into a tight log. Twist the ends like a candy wrapper. Repeat with the second piece. Chill for at least 30 minutes.
6. Pastry Wrap
Brush pastry with egg wash. Remove cling film from elk and wrap each log tightly in pastry. Trim excess, seal seams, and brush all over with egg wash.
Chill again for 30 minutes. This helps the Wellington hold its shape and bake evenly.
7. Red Wine Sauce (Do This Ahead)
Brown trimmings in olive oil. Add shallots, peppercorns, bay, and thyme. Cook until golden.
Deglaze with vinegar, reduce, then add red wine. Reduce almost completely. Add stock and simmer gently for about an hour. Strain, season, and set aside.
This sauce is forgiving—and makes the dish feel truly finished.
8. Bake
Score pastry lightly. Brush again with egg wash.
Bake at 200°C / 400°F for 15–20 minutes, until golden and crisp. Remember: elk cooks fast.
Rest for 10 minutes before slicing.
Serve & Enjoy
Slice thick, spoon over red wine sauce, and serve with simple sides—roasted roots, mashed potatoes, or wilted greens.
Final Thoughts from Shotatarian
This is the kind of dish that looks intimidating but rewards confidence. If you can sear meat, cook mushrooms, and roll pastry, you can make this.
Elk Wellington isn’t about perfection—it’s about respect for the ingredient and trusting the process. Take your time, prep ahead, and enjoy the moment when you cut into that golden crust and see perfectly cooked wild meat inside.
Wild food doesn’t have to be rustic.
Sometimes, it wears puff pastry.
Stay hungry, stay wild.
— Shotatarian.com

bear grease biscuits
Bear grease biscuits. There’s a comfort in food that remembers where it came from. Make a pan, gather around, and eat like you earned it.
Title: Bear-Grease Biscuits —
There’s something honest or just feels right about bread cooked over a cast-iron and made with ingredients you hunted and rendered yourself. These biscuits are a family favorite and what I turn to whenever I have a guest staying at the house. Bear grease is an awesome ingredient; it’s actually my favorite part of the bear. Natives used bear grease for a variety of purposes, from food and medicinal uses to waterproofing. It gives baked goods a silky, deep, savory note that is totally unique. Simply put, these are the best biscuits you’ll ever eat! Prefect with coffee at dawn or stew at dusk. Treat the fat with respect; this is one of nature's most amazing ingredients and they are easy to make.
Ingredients
2 cups all-purpose flour
2 1/2 tablespoons baking powder
1 tablespoon salt
1/3 stick (about 1 1/2 tablespoons) cold butter, grated
1/2 cup cold bear grease, diced or chilled until firm
3/4 cup milk or cream (buttermilk is a great substitute)
Equipment & prep
Large mixing bowl
Pastry/patty cutter (or two knives/fingers)
Grater for cold butter
Rolling or floured surface for folding
Biscuit cutter or sharp round cutter
Cast-iron skillet or baking pan, pre-greased with bear grease
Method
Preheat the oven to 475°F (245°C). Place your cast-iron skillet or baking pan in the oven to warm slightly, or pre-grease it and set aside.
In a large bowl, combine the flour, baking powder, and salt. Mix until evenly distributed.
Add the grated cold butter and the chilled bear grease. Using a pastry cutter or spatula, work the fats into the dry ingredients until the mixture is coarse and clumpy — you want small, pea-sized pieces of fat still visible. Don’t overwork it.
Pour in the milk (or buttermilk). Use the same pastry cutter to incorporate the liquid until a shaggy dough forms. Again, handle it gently.
Turn the dough out onto a lightly floured surface. Pat it down with your hands to about 3–4 inches thick. Fold the dough over itself and press down; repeat this folding and pressing 5–6 times. This creates flaky layers without heavy rolling.
Flatten to your desired thickness (about 3/4–1 inch for a taller biscuit, thinner for faster baking). Cut biscuits with a cutter (or make them by hand if you don’t have one) and place them in the pre-greased cast-iron pan, leaving a little space between each.
Bake at 475°F for 12–15 minutes, or until the tops are golden and a toothpick comes out clean. Baking time will vary with thickness and altitude (I’m baking up at 7000 ft above sea level).
Remove from oven and brush tops with a little warm bear grease or butter, if you like. Serve hot.
Notes & tips from the hunt
Render and strain your bear fat well. Any moisture or impurities left in the fat will shorten shelf life and affect flavor. Keep rendered fat refrigerated or frozen if not used immediately. I freeze my rendered bear fat in mason jars and treasure them.
For extra flaky layers, keep ingredients cold and avoid overworking the dough. Warm hands mean smoother, less flaky biscuits.
Buttermilk adds a tender tang and reacts with the baking powder for extra lift. If using regular milk or cream, the texture will still be good.
Cook over medium-high heat in a preheated covered cast iron to mimic the oven method if you want a campfire variation—watch closely to avoid burning.
Serve suggestions
Split and slather with butter and honey or serve alongside venison stew, eggs, and bear sausage, or smoky bacon. These biscuits stand up to bold flavors or are great on their own!
There’s a comfort in food that remembers where it came from. Make a pan, gather around, and eat like you earned it.